My little crafting world....


Hi all
I'm a complete craft addict! I have a small business called Surrey Crafts teaching craft workshops from my studio in Esher, Surrey and at venues around the country. I teach mixed media, decorative painting, card making and papercrafts, jewellery making and creative embroidery classes. If you'd like to find out more just leave a comment, or take a look at my other social media pages:
Facebook: https://www.facebook.com/surrey.crafts
Instagram: https://www.instagram.com/surreycrafts/
Pinterest: https://www.pinterest.co.uk/surreycrafts/
Crafty hugs & stuff
Suz

xx

Sunday 9 August 2020

Alcohol inks abstract art

 Here's a litte abstract artwork I made on my Create and Craft tv shows on Saturday 8th August.


I used cobalt and mojito inks, then just added a few drops of statue alloy ink, with blending solution.

I then showed how to use the applicator tool to swipe across the Yupo. 


Here's a link to the show, available for 30days.


https://www.createandcraft.com/gb/shows/ranger-ultimate-alcohol-ink-kit-2822109?channel=cc


Friday 29 May 2020

Circle of Thorns Hello Card

Hello lovely people.

Here's a bright and fun card using a gorgeous new stamp Called Circle of Thorns by Andy Skinner. Hopefully you'll see this make an appearance on Create and Craft tv later in June.

Using a versamark ink pad and Andy's Satin Sunset embossing powder, I randomly stamped the image, then heat embossed it.
 I blended in some Bright Sunshine Colour cloud.
 A sentiment stamped out and inked around the edges.
The embossing powder has hints of red, so I used red gems to pick that out. A little bit of ribbon and lace and there you have it. I loved making this quick and simple, but bright and beautiful card.  
I hope you like it too.
Thanks for looking.
Suz

Saturday 2 May 2020

Repurposed canvas and bandage dressing

Hi all
I made this fun canvas to join in with the Creative Expressions Mixed Media Challenge day 1 with the theme of 'Bright'.
I took an old canvas I no longer liked and covered it with vintage book pages then a coat of mixed media paint. 
Then added Intense Pigment Stains in Bluebell, Emerald and Citrus Lime, layering up until I liked the colours.
I then used the same products to colour an old field dressing/ bandage and that had been in my stash for years (not useable as no longer sterile due to damaged packaging) and a piece of hessian fabric. I spritzed water to help the bandage and hessian soak up the colours.

Taking the Smashed Glass Andy Skinner stamp, I used my stamp platform and Versafine Jet Black ink to stamp onto a piece of calico. frayed the edges and stuck it down onto the hessian. I had to use red liner tape as wet glue would have seeped through, activated the colours underneath and stained the stamped calico.
 Glass gems and fabric roses gave a pop of red to the canvas. But it needed something else. So I wrapped wire around my spritzer bottle to form loops, then stuck these underneath the focal point of the layered bandage and fabric.
 You can see some of the text through the colours here and below.


 Love how colourful this is.

Thanks for looking.
Suz
x

Friday 1 May 2020

Sending Hugs


Hi all

Here's my project for the May Craft Stamper Blog Challenge. A pretty card with a wired heart and paper rose embellishments. To find out about the challenge and the fab prize, click HERE.

I made a mixed media background on Coconut White card using the white paint, Intense Pigment (Rich Crimson) and the Pixie Powders (Scarlet Mist and Mango Blaze). Once dry I dusted with the anti-static pad then used Andy's Smashed Glass stamp, with Versamark Ink and gold detailed embossing powder.


I also used the paint, Intense Pigment and Pixie Powders on a piece of fabric, which I use for the background and as a ribbon across the card. To embellish I added a piece of wire I'd shaped into a heart.


This looked a little bland so I then made a paper heart by rolling up copy paper coloured with the IP ink, and snipped a few black leaves from card I'd cut with the Leafy Frame die, adding some gold treasure Metallic Gilding Polish.


A stamped sentiment from the Big Ideas sentiment stamp set, and mounted them onto a little flag die cut from a Stitched Flag die set by Sue Wilson. Along the stitched detail I drew lines with a sharpie marker. This really makes it look like stitching. A few gems, a piece of lace and a thin strip of paper and it's finished.

Friday 17 April 2020

Retro Spark Plug Wall hanging for Andy Skinner's Creative Team

A little project today inspired by a spark plug I found!
It started with a kit.....Andy's Gelli Plate 3D canvas kit from Tando Creative, plus lots of Creative Expressions goodies!
Olive Grove and Warm White Chalk paints on the small squares from the kit. 
 A little more chalk paint dry brushed over.
 On the large square backing panel I used black chalk paint. Onced dry I used a 50/50 mix of Strata Paste and Structure Paste.
 I did the same to all the small squares too.
 On the left are all the ones I painted with Mustard Seed - I only used one of those in the end, for the middle.
 All the pastes dried rock hard and I painted each square (large and small) with the Yellow Iron Oxide, then Paynes Grey and Quin Gold, and finally a bit of Raw Umber.
 Did one of Andy's 'Dirty Washes' over the front of the little squares too - you can see the difference it makes below. I had also added the rub on transfers before the wash and it was fine.
 A well washed but rather battered spark plug.
 Painted with the colours above.
Then wrapped with wire to form a hanging section for the art, threaded through holes punched in the back board. Small panels glued on with Quick Grab Glue.
 Middle square, which I'd made to go at an angle, also glued down - this is where the glue comes into it's own, used on top of the uneaven pastes it holds really well.
And that's it! Thanks so much for looking.
Suz

Click here to see the full list of products on my 'quick post' on Andy Skinners blog.

Friday 3 April 2020

HOPE - for the Craft Stamper April Challenge

Hi all

Hope is something many of us need right now. It is a very difficult time and our new world and way of living is affecting so many elements of our lives. So I just want to send a little hope out to all of you. Talking of hope - there are GORGEOUS stamps and a stencil to be won this month, seriously, they are beautiful, and I HOPE you will take part! Take a look HERE.
 I used two vintage book pages, Shakespeare don't you know, (sold by the library years ago as falling apart) glued them together as they were very thin. Added a layer or watery gesso so the text would shows though.
 A little more gesso, then some light blue DecoArt paint added with a very watery brush.
 Stamped Andy Skinners 'Memories of India' stamp, firstly in a green, Shabby Shutters colour, then I stamped it some more with a clear Versamark pad and used a very pale pink embossing powder by Creative Expressions to build interest in the background.
 Then I used all the foliage stamps from Jane Gill's Woodware stamp set 'Hare in the Middle' (JGS699), inked with Olive Memento ink and then with Versamark and heat embossed with clear powder. I did this on my stamp platform as I repeatedly stamped each of the images to build the layers.
 You can just make out the pink embossing in the background in the photo below....
 My plan was to use little white flowers to fill all the gaps I'd left in the foliage. So I used an old die set by Susan's Garden called Flower Yarrow as it cuts loads at once - but you could use any small flower die or punch. I added tiny white pearls in the middles and glued down with Cosmic shimmer. I also found this pretty butterfly which I had in my stash - it was in a set from either the Range or Poundland. To make the antennae I just looked around for a slither of card I'd cut when making another project!
 The Hope stamp is another Andy Skinner stamp. I coloured it with the ink used for the foliage.  Once dry I added another little flower to the edge to tie in with the rest of the card.
And that's it for now.
Thanks so much for looking. Please do keep going.... and have hope.
Suz
xxx

See below for links to the stamps I've used:
Memories of India
Hare in the Middle
Hope

Saturday 28 March 2020

Handle With Care 3D Challenge Craft Stamper AND FOLLOWER GIVEAWAY

Hi all
I'm almost at 40,000 views on my blog - when I reach that I'll be doing a giveaway - a little box of art goodies to one of my followers! To be in with a chance, complete the 'follow by email' box on the right hand side bar! And when I reach the magic number I will pop up another post with the prize and winners name. Good luck!

A while back I was invited to make a 3D project for the Feb 2019 edition of Craft Stamper. Small wooden hearts were the challenge - and with it being the February edition and Valentines and all.....I just had to use broken scissors and a broken candle holder! I know, I'm a bit strange. But it made perfect sense to me! It was because I'd chosen a stamp 'Handle with care' that perfectly fitted the largest heart....and I thought my scissor handles would be a quirky fit for the 'handle' bit. At the same time I had also been teetering on whether to throw away the broken ceramic candle holder - there must be a way to use it, I thought, I'd paid good money for that, before dropping it, ooops!  So .....here is the finished project.....
                                                       and here's the process....
Sat looking at them for a while.....put the scissors in the broken candle holder hole....how can I make the scissors secure?
 Left that problem for a bit and painted the hearts white....
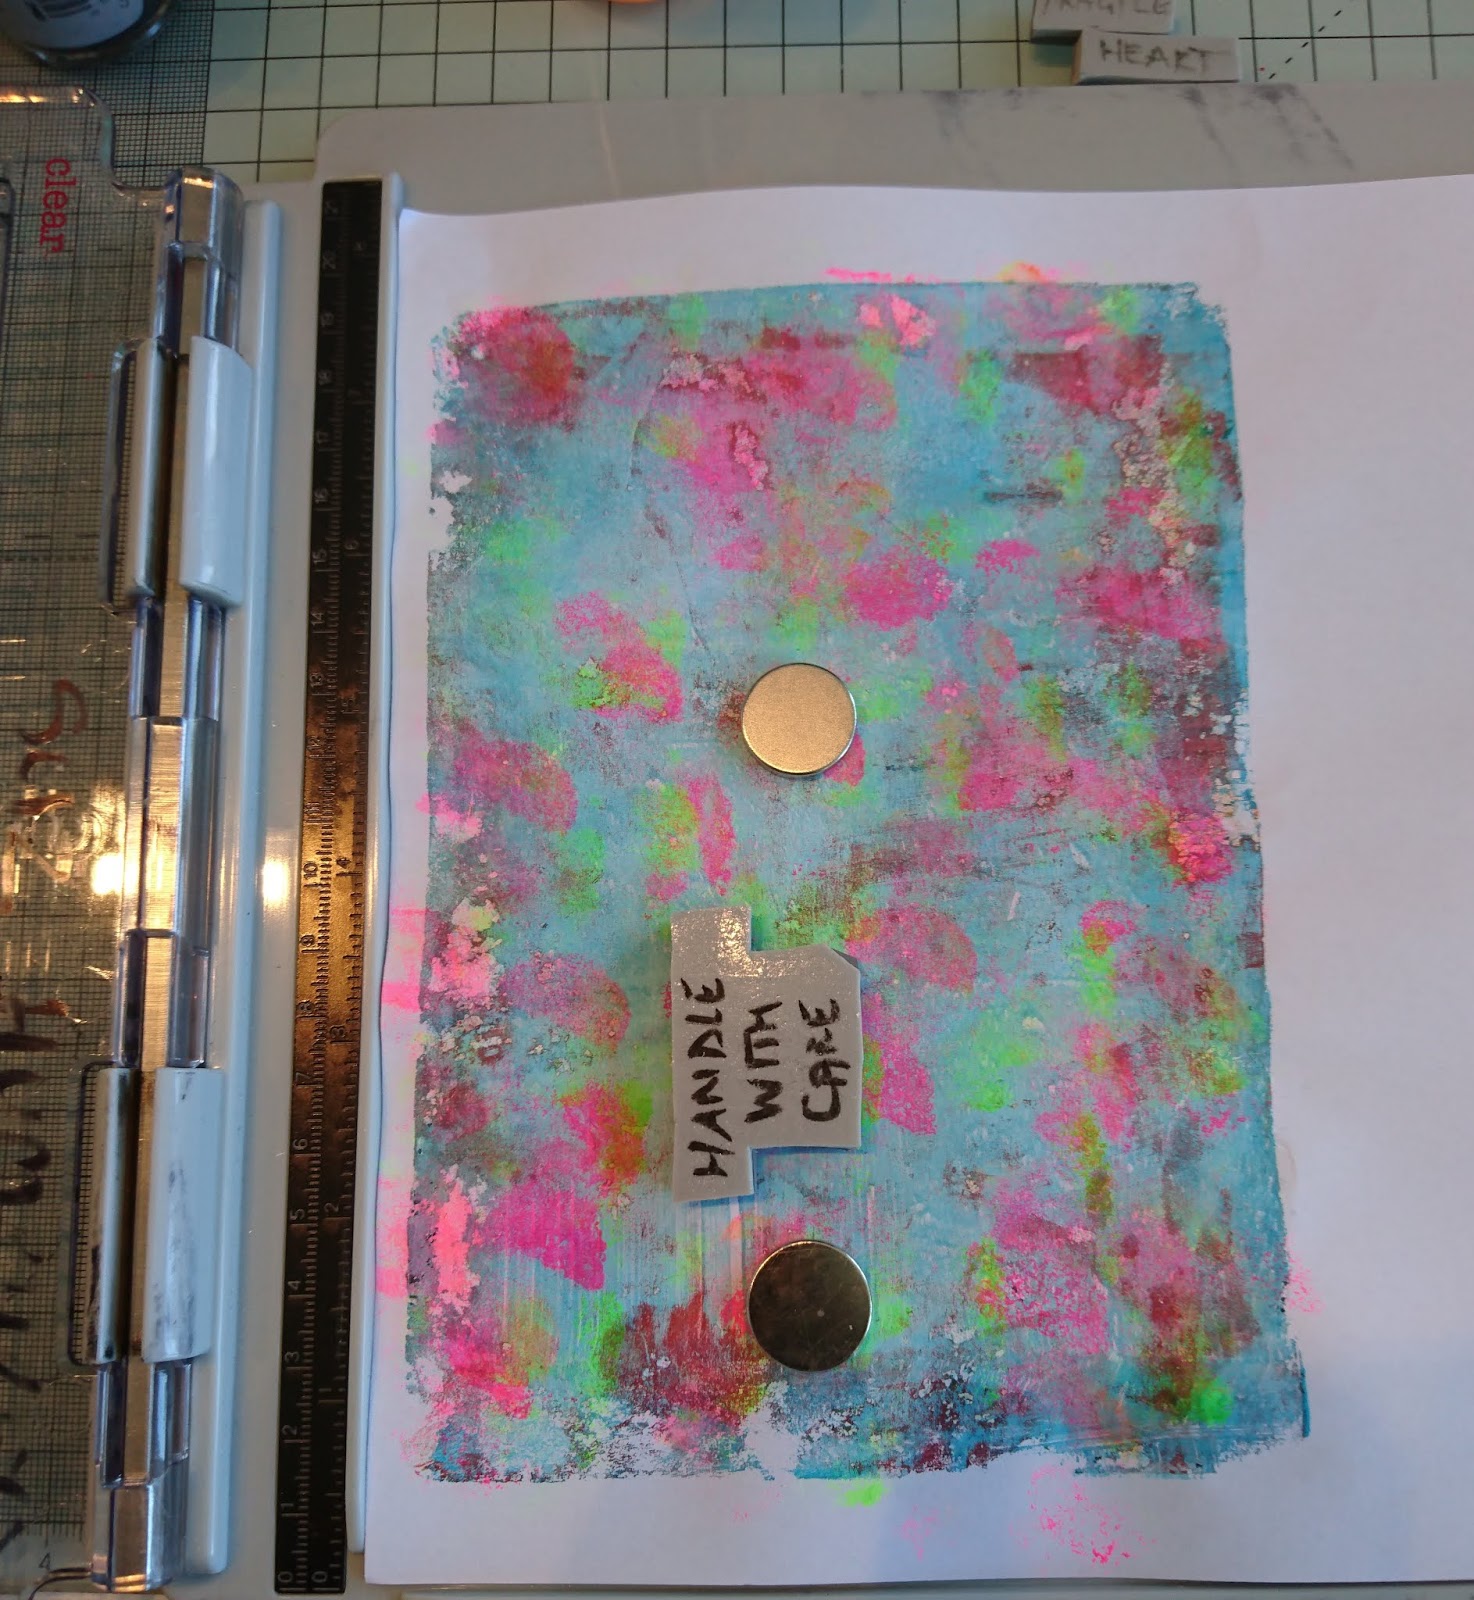
 Decided to make a gelli print to decoupage onto the hearts.....thought all red would be a bit too obvious for the hearts....so to my usual fab colour of cobalt teal hue! I added a little red, just as a token nod towards Valentines day.
 Then for the fun part! Neon green dabbed onto the print, dried , then neon pink. I LOVE those colours! Especially when it is November and you are making lots of wintery,  Christmas stuff, lol.
Paper dried, Andy Skinner text stamps at the ready, (to see his full range click HERE ) on to the stamping platform. Bit tricky as the paper moves a bit as so thin and I forgot to use my anti static pad (doh!). But I got all the words stamped onto the paper in the end.
 Popped the hearts on top and tore round them, it was just a rough tear for positioning. Once I'd done that I used a sanding block to tidy up all the edges.
 And a sudden idea on how to stick my scissors to my broken base......air dry clay! I pulled some out and shaped it around the scissors, smoothing it down onto the base. Then left it to dry overnight. I was still a bit nervous about this breaking in the post when I sent it off for the magazine pictures...so I then used some plaster roll to strengthen it all even more.
Cut a strip from the roll (you get lots!), then cut it lengthways, dipped each strip in water and draped and moulded them to the scissor base. You can get this quite smooth if you work it, I left some a bit textured as I love that look.
 So that I could paint onto the metal scissors, I coated them with DecoArt Multi Purpose Sealer. I did the hearts too….not sure why! Once all that was completely dry I painted the whole thing with white gesso - but forgot to take a picture.
I cut fairly long sections of 4mm jewellery wire and twisted some spirals a few centimetres from the top of the wire.  I used a tiny drill bit to drill a hole into the bottom of each of the hearts, then pushed the top of the wires into the holes, they were a really snug fit! 
 Having decided where I wanted them, I took them in turn and wired each of the hearts onto the scissor handles.
 Next wire added to have a smaller heart in the middle above the largest....and then the final two to the sides.
 I added more wire to the base to tie it in with the top half, then used Andy's window stamp as the criss cross middle is a fab pattern for texture, stamping randomly between the wire with an Archival ink pad.
 Here's another pic of the base
 I also stamped onto the scissors.
 Loved the movement the wire gives - hoping it survives being bent for posting!
 A pic of the finished piece.
Thanks for looking!
And good luck out there.
Suz
xxx