My little crafting world....


Hi all
I'm a complete craft addict! I have a small business called Surrey Crafts teaching craft workshops from my studio in Esher, Surrey and at venues around the country. I teach mixed media, decorative painting, card making and papercrafts, jewellery making and creative embroidery classes. If you'd like to find out more just leave a comment, or take a look at my other social media pages:
Facebook: https://www.facebook.com/surrey.crafts
Instagram: https://www.instagram.com/surreycrafts/
Pinterest: https://www.pinterest.co.uk/surreycrafts/
Crafty hugs & stuff
Suz

xx

Wednesday, 9 March 2016

Punky Skull

Hi all
So here's the finished skull - complete with Jewellery!!!

Here is a quick post about a page I made using Decoart Media Fluid Acrylics and my new Americana NEONS - vibrant!!! 

Close up of the nose ring,
chain and brooch made
with Andy Skinner Stamps!

Close up of the earring and Andy's 'Shedded'
stencil which gives a brill snakeskin effect!

Here's how it all started - with a simple sketch.
Drawn with a Pitt artist pen and gessoed over
 with slighly watered down gesso so I could still make
 out the drawing.

Here are the paints and stamps I used.
For details of Andy's products, and a
chance to win some of them click here.

 
I used various media acrylics in greens, quin magenta and some black texture paste which I scratched into, also the spiral stencil (just left over on the stencil from another project) while I decided what to do with my skull. I knew these random bits would add texture.

In the stage before this I also used some black texture paste through Andy's 'shredded' stencil  and once done I went over the whole thing with a light brayering of translucent white. Love how it picked up the textures like dry brushing.

Then just started playing! Coloured eyelids with metallic paint, doodled and started working on the hair with neon pink, adding white to start with to make it more opaque then building more layers with the concentrated pink.

Carried on working on the hair and hearts with the pink. In between layers I used a carbon pencil to outline and smudge to give depth. Paynes grey for the pupils and more detail with a pen.

Still needed more colour so I used a 'you can folk it' dotting tool and the neon orange around eyes and shoulders and green on the jacket - getting there!


More pink, pink dots, Andy stamp where
I thought I wanted to position it.
This shows the finished page in slightly better light, complete with REAL jewellery and multi toned hair and hearts!
Hope you like it. I'll enter this into Andy Skinners Blog Challenge which is 'bold and bright' and finished today!
Thanks for looking, any questions just drop me a comment.
Ta Suz xxx

Friday, 4 March 2016

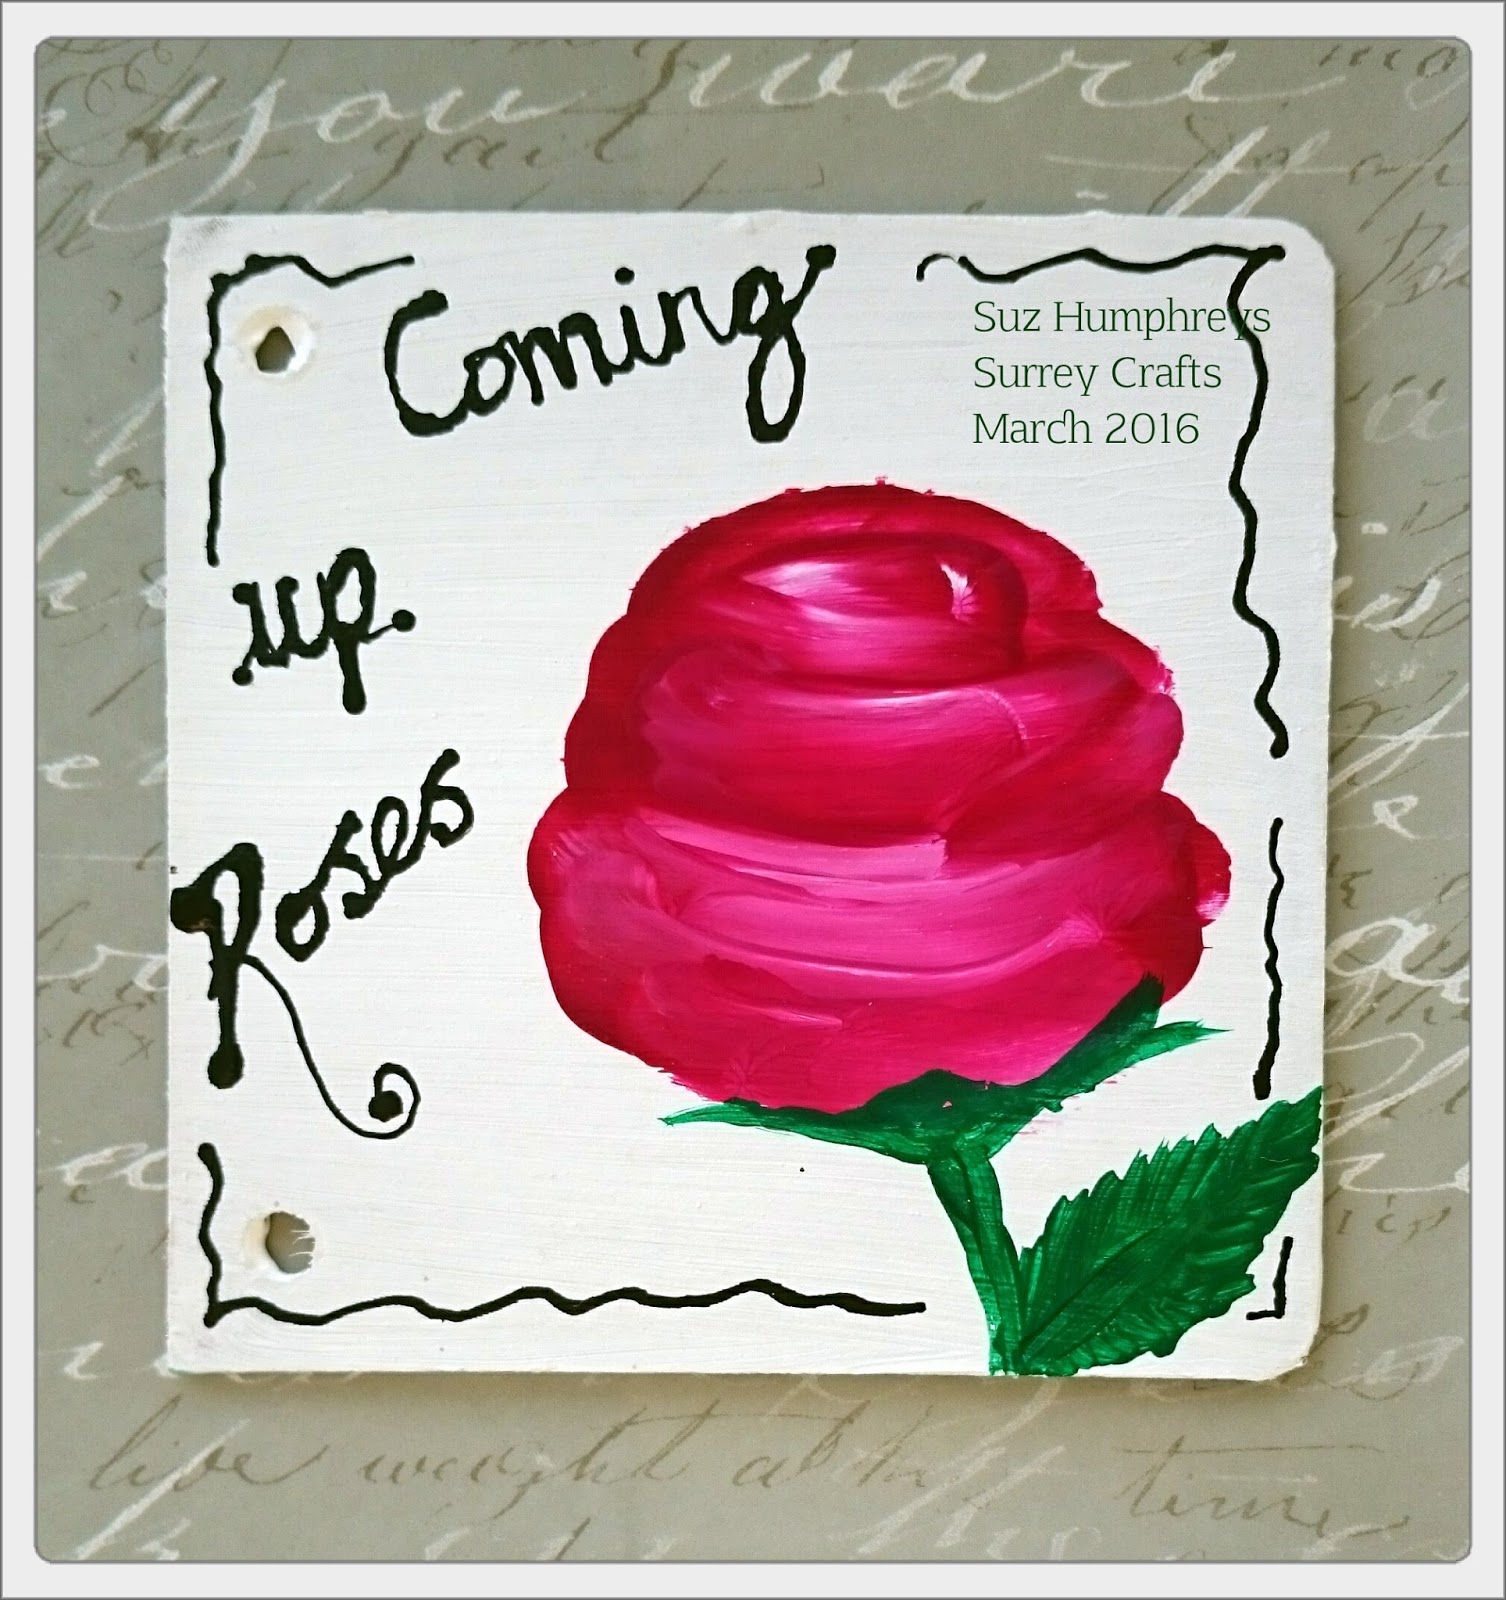
Simple and super fast technique to create bold flower heads using DecoArt paints


Hi again all!
Another quick post to share a super easy technique for painting flowers. This came about from a journal page I made for a lovely journal group on Facebook called Embrace Your Art by Tiare Smith Woods (love her work, click on her name to see her blog) and her prompt was about using a straw to blow paints.  Well I had a play and it kind of evolved into a completely new technique for me. I created a journal page (second pic) and posted it on Facebook. Then I was asked to do a blog post to show the process, so this is the original journal page, but as I hadn't taken pictures  of the process (again!!) I created another little artpiece (single rose above) just to show how easy it is and how it's done.


 All you need is a surface (arty peeps call it a substrate) and for that I broke into my new mini ring binder and used one of the grey board pages inside. This is by Tando Creative click HERE for details.
Cover surface with white gesso

Add just a TINY number of paint drops - I used about 3 drops of the Quiacridone MagentaDecoArt Fluid Acrylic paint and got a generous sized flower.
Spritz over the top lightly with water.
Blow paint around with a straw into a pool of paint similar to the on below - don't try and be precise, just work with it using the shape to dictate which direction your flower will face.
Then simpley smoosh the paint with one finger in a swirl. 
Repeat this motion from left to right, then right to left working your way down, and back up to if you want to, to create a very simple flower effect.

Top tip 1- you get a much better effect if you do this while the gesso is still wet, and the harder you press with your finger, the more gesso will come through - and it's that which creates the contrast and white highlights. Done!!!
Top Tip 2 - if you feel the flower has become a little too big or 'out of control' you can go back around it with white gesso to shape it as you like. this is what I did on the journal page as the blobs of paint had spread too far with the straw. Worked a treat!
So now I'll enter this into Andy Skinners challenge 'bold and bright" on his blog

I then mixed a little green with the black and added leaves and a stem. And finally I tried ANOTHER new technique to try and write with the paints. I used added a few drops of the green and black paint to fine writer applicator pictured above. Spritzed in a few squirts of water. Gave it a shake, tried it out on scrap paper and then wrote directly onto the board - love it! With a little practice I hope to write more smoothly as the gesso was a little more textured than the practice paper.
Thanks for looking and enjoy! 
Suz xxx

DecoArt Skull media tag using Metallic Lustres and Crackle Paint - with steps of the process


I made a really quick project this week using my new Tando Creative Media board. They're just the right size for a play. To find out more click HERE. Once I posted the pic of the finished project I had some lovely feedback so felt a blog post with a step by step of the process would be a nice idea. Slight snag: I hadn't taken pics of the stages while I was making it (typical!!!) but I knew it would be easy to recreate the steps, and fun to use a different embellishment too.
          
A quick coat of the lush DecoArt Media Black Gesso onto the Media Board - lovely creamy paint this!
Once completely dry (very quick as used a heat tool), I grabbed a few DecoArt Metallic Lustres. These again are a lovely consistency and thick enough to give a complete coverage on most surfaces.
  
However I wanted almost a 'dry brush' effect on the lovely gesso texture, so I dabbed the tiniest amount onto my finger and brushed lightly across the painted base, thinly enough for some of the black to still show through as you can see from the close-up. 


I repeated this with a total of 4 colours, just to see how the worked together. 


                               So having created a nice messy background I now wanted a crisp and sharp contrast to lay on top, adding more texture and some brightness. I used the DecoArt White Crackle Paint. I LOVE this product. It is the easiest crackle product I've ever used, dries quickly, starts to crack within minutes (so you don't have that dilemma about whether or not its working!) and is a vibrant white once dry.
This was straight after applying the crackle paint - before the cracks appeared.
Here is the second board next to the original - already cracking and I only just put it there, this shows you how it will eventually crackle!

That was soooo easy. Now the hard part - what to lay on top! For the original I used a skull embellishment I found while out on a walk with hubby about a year ago, it's been waiting for a background like this! It had two rivets at the back. I used them to hang some chain on before gluing down. I grabbed a few bits of broken costume jewellery and some bendy jewellery wire. With the wire I made a handle (another two holes punched) by winding it through the two holes then round itself and around to the side of the board. I added some beads and a decorative bead which I thought looked like either a snake or a sword. Once threaded onto the wire, I added a dab of glue on the wire to stop them falling off and bent the wire to the direction I wanted.


For the second board I using a fancy button and a few copper tacks and for a lighter look I used a more copper coloured jewellery wire for the handle and to wrap around the line of nails. I'll give this a spray of Americana Sealer/ Finisher Matte spray to give a bit of protection too.


And voila - almost identical and finished in super quick time - though the glue will need a little longer to set completely. 

Thanks for looking, have fun playing and feel free to ask any questions!
Suz
xxx

Wednesday, 24 February 2016

Workshop with Tim Holtz

Hi all

A quick post about the fantastic workshop I attended with the amazing Tim Holtz last weekend at the NEC Birmingham, a little bit about the new products and my finished workshop sample.

Gotta start with a pic of the great man himself.  He was very entertaining and I love this pic as the expression on his face reminds me of some of the funny stories he told, about little things likehow not to take the lid of the distress inks and the dangers of too much paint on the 'spackle brush' (long plastic bristles in the pic below). 

As well as the distress paints, we had a chance to use the beautiful 'crackle distress collage medium' which can be coloured - both as a collage glue for paper and for the texture of the fine eggshell cracks. This glue is unique in that it sticks IMMEDIATELY - no wiggle time so really great for quick makes. We used the texture paste, which is opaque even with just a fine layer, can be coloured and is great to use the new crayons over. For the metal embellies we used the matte medium as a glue, very strong and pretty quick drying. We also used the mini collage glue stick; also great for paper but Tim showed us that it was also fab to use with the foils: just add some to your work, lay the foils on top (coloured side facing up), leave to try and peel away the sheet - BEAUTIFUL hints of colour (see images).We were able to use one of the new frames, and the beautiful distress crayons. Now I have sent the crayons to a friend to play with so can't take a pic of them - they are in this pic but under the mediums in the bag. We also had a play with the new brushes (sadly had to give these back!) The soft one was beautiful. The spackle brush just needs to be handled in the right way. After his description of how far the paint can go with this brush if too much is used, and how we should be careful of the people in front of us (!!!) I had a giggle and put my coat on, turning to find Maria Simms and friends in the row behind had a little twinkle in their eyes! We all listened to the advice of just a tiny bit of paint and all went well.
 Couple of pics of me with my buddies (lol) firstly Tim, and also my lovely fellow 'Art Warrior' from our Sue Tucker 'Art Workshops' group and Ministry of Mixology Retreats, Diane Waldock.  
 Finally here are my samples, with close ups of the blue and gold foils on the frame and letters, painted and stamped letter blocks, paint splatters, crackle texture, stenciled texture and crayon colour.


Hope you like it....feel free to comment or ask any quiestions. 
Suz x

Thursday, 28 January 2016

Next card making workshop Saturday 13th February 2016


Hi all. Quick samples of my next workshop featuring those fab Time Holtz Crazy Birds and accessories.
Morning session fully booked but 2 places left in the afternoon at 2pm.
Cost is still just £8 including tea/ coffee and biscuits. All equipment provided.


Sunday, 24 January 2016

Bluebird for Mum and David Bowie, with words from his last song Lazarus


The idea for project was inspired by the Journal 52 group on FB and by the lyrics of David Bowie's last song and the Winter Wonderland them on the DecoArt Mixed Media Blog. The Journal 52 prompt for the week was David Bowie lyrics after he passed away earlier in the month. My Mum, Rose, also passed away this month, just two days after Bowie. And they shared the same birthday. So when I looked at the lyrics from his last song 'Lazarus' I just loved them and I knew I wanted to make a page dedicated to them both

I looked at pictures of Bluebirds on the tinterweb to help me choose my colours. They were like Robins with blue backs.

 I'm also using the card covers of old unwanted vinyl albums to create journal pages this year. So I gave that a couple of coats of white gesso.

 I wanted to have the bird on a branch so used the DecoArt stencil below to roughly sketch branches with pencil, then I drew my bird onto white card, traced him and roughly positioned him using the tracing paper over the tree area.  I erased the branches around where he would sit. I used the DecoArt Media Fluid acrylics below to paint my Bluebird, the background and the tree. I printed out the lyrics onto copy paper and these I sprayed with DecoArt matte varnish to prepare them for gluing onto the album cover, as I know my printer ink smudges if it gets wet. 

I then glued the bird and lyrics into place. After that I used some Pitt markers to add a little 
depth to the bird and around the words.

 At this point I thought I was finished, but I came back to it the next day and wanted to add a little more interest. So I used more white paint applied with a spatula and credit card around the edges, and added white Glamour dust to the snow areas using Cosmic Shimmer glue.

You can see the glitter detail a little more here. 
 
 I was happier with it, but still felt I needed to change something. I then added a little more black to the eye, then I decided to stop as I was close to making a mistake and ruining it all going overboard!


 These are the items used. I hope you have a go and have fun too. Suz x


Monday, 18 January 2016

A loving thought

It was a difficult week for me last week as my lovely Mum passed away. But the loving messages I had gave me such strengh. Then on the day after she died I found a beautiful little book of poems among her colouring stash, and one in particular summed up just what I felt about all the support I had....so I created a journal page around it and here it is.
Here's the page - I loved making it. 

 This was the actual poem written by Gen Macdonald.
This is the book, written in 1902, which I didn't even know my Mum had.
So thanks for your loving thoughts and I'm sending them right back to you!
Love Suz
xxx