 |
| And here is finished Dennis the Dragon...a bit buckled, after all he is only on a bit of scrap cardboard, and I used a lot of wet products and watery washes. Maybe I'll have a go again some time on canvas. Thanks for looking. Suz xxx |
So at long last Dennis the Dragon is finished. And here's how I made him.
 |
Just for a bit of fun one day, I grabbed a scrap piece of cardboard and started sketching a dinosaur head, as you do.
I applied crackle paint and sculpted it inside my sketch line using a pallet knife.
Once dry I started washing colour over him, but his skin was a bit thin in places, I wanted more texture, depth and crackle. So I applied a second layer in areas where it was too thin (and so very tiny crackles).
This dried leaving a brill 3D effect of big peeling cracks which were prefect for Dennis.
|
 |
| I applied washes of watered down Yellow Iron Oxide, touches of diluted Quinacridone(Quin)Gold, Quin Red and Quin Burnt Orange and Sap Green. Once dry I began to wash over again with Prussian Blue Hue. |
 |
| To sculpt his horns and eye,I used a pallet knife and white modelling paste and a dotting tool. |
 |
| I Painted the whole background with white Gesso, then with a mixture of the red and gold paints used in step 1. |
 |
| I applied Carbon Black paint to his horns. Then a mixture of red, gold, black and white to his eye. I also added more gold highlights to the fiery background and touches to the horns. |
 |
| To give his eye a glassy look and add dimension I added liquid glass. |
 |
| I worked on his eye a bit more, adding more crackle, and some then began working on the horns, adding PVA glue to start with (see info further down about what else I added to the glue).I also gave him some sparkly knashers to bite with.... |
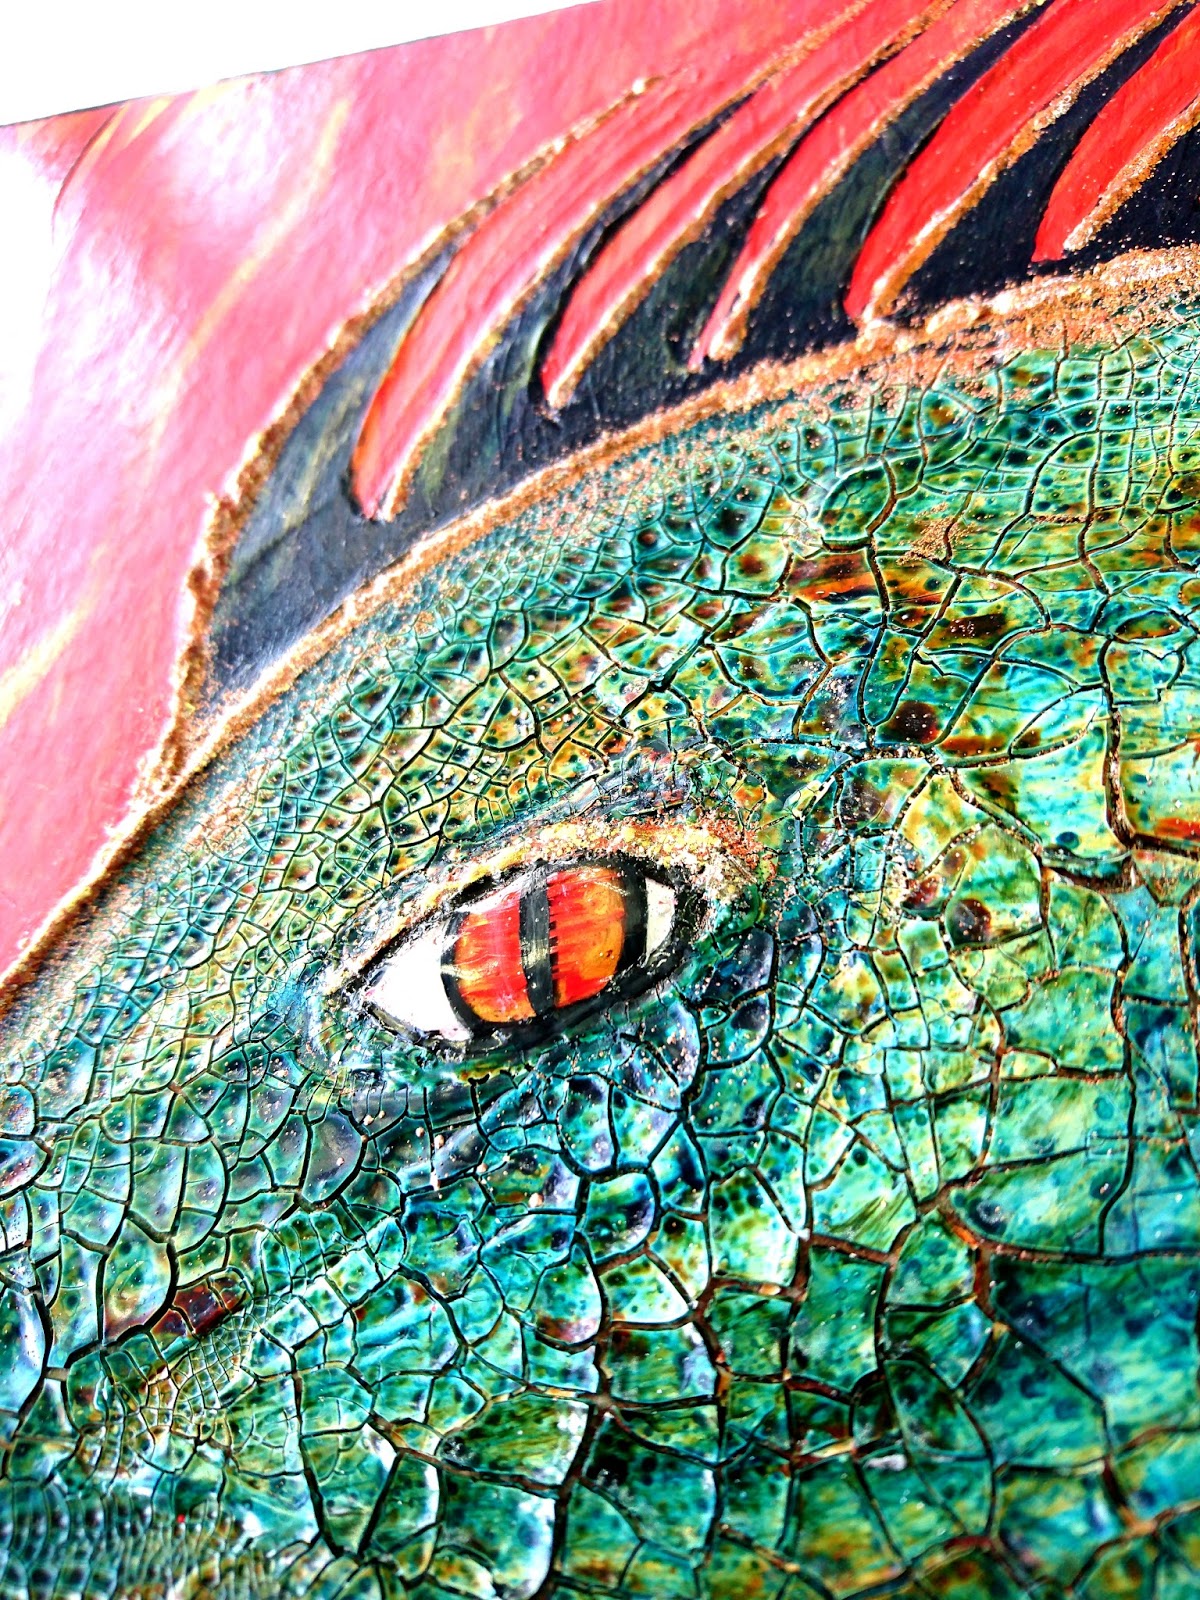 |
| Around his horns I added Cosmic Shimmer Glue, then Stampendous Aged Ochre and Spice embossing enamels and melted them with a heat gun. When you heat this glue it bubbles up ad gives a texture I love, especially when melting embossing powders, etc to it! Some specks got onto other areas, I was fine with that. |

|
| And here is finished Dennis the Dragon...a bit buckled, after all he is only on a bit of scrap cardboard, and I used a lot of wet products and watery washes. Maybe I'll have a go again some time on canvas. Thanks for looking. Suz xxx |
He's fab Suz! 😊
ReplyDeleteThanks so much Sarah, he was good fun to make. :-) x
DeleteThis comment has been removed by the author.
DeleteDennis looks magnificent, fabulous step by step too!
ReplyDeleteThanks so much for your lovely comment Karin.:-) x
DeleteSuz, I love the way Dennis has turned out and thanks for the fabulous tutorial. Looking forward to seeing you again at Dare 2 Cate in June xx
ReplyDeleteThanks lovely, my pleasure! Looking forward to seeing you too! Not long now. :-) x
DeleteLove Dennis :) Fab tutorial too hun. Xxx
ReplyDeleteThank you Nikki darling! xxxxx
DeleteAbsolutely FABULOUS Suz... WOW WOW WOW.... I'm in LOVE with Dennis. Xj.
ReplyDeleteThanks Soooo much Joi, bless you hun. xxx
Delete